Feb 21, 2017

BOT ADF.LY 2017 Generator Terbaru

DvikzzSilahkan bagi yang ingin Download Adf.ly Bot Generetor Terbaru 2017 dan semua penyalahgunaan software serta programnya ditanggung penumpang dan penonton saja, ok guys sebelumnya juga sudah dishare dengan Paypal Cash Generator 2016 ok tanpa panjang lebar lagi bagi yang ingin mencurangi system adf.ly silahkan langsung bot saja hingga mencapai jumlah klik yang tak terbatas.

Adf.ly Bot 2016

Download saja langsung bot adf.ly DISINI tidak pakai lama keburu ada razia dari team adf.ly, silahkan digunakan dengan bijaksana dan waspada.

Hanya itu saja info dengan Download Adf.ly Bot Generetor Terbaru 2017 - 2018 semoga bermanfaat dan membantu dan atas kunjungannya kami ucapkan terima kasih, kami hanya mau berbagi saja kali saja ada yang membutuhkannya.

Download Juga Guys: Adfoc.us Bot 2016
Baca selengkapnya

Mar 14, 2015

Feb 9, 2015

Root Acer Z200 Windows 7 dan Windows 8.1

Root Acer Z200 Windows 7 dan Windows 8.1

Dvikz Cara Root Acer Liquid Z200 di Windows 8.1, saya mengira tidak akan berhasil jika melakukan Root-ing Smartphone ber-prosessor Mediatek sebab selama saya mencari di Google tak membuahkan hasil. Karena saya sedikit mengerti permasalahan terhadap driver mediatek saya mencoba beberapa macam cara yang dilakukan pada umumnya (Windows 7) ternyata dalam proses tersebut membuahkan keberhasilan, mungkin blog ini menjadi saksi pertama Root Mediatek Prosessor di Windows 8.1 karena Forum Z200 di Kaskus - XDA pun belum menemukan jawaban atas permasalahan driver Mediatek tersebut (mungkin). 

Bahan yang digunakan :

Langkah Awal

Download semua bahan yang diperlukan lalu ekstrak semua file ke dalam satu folder untuk mencegah kebingungan lalu gunakan otak dan pikiran serta kreatifitas kalian karena Root adalah sebuah seni, Gambar dibawah merupakan permasalah yang sedang kita hadapi pihak ketiga tidak mau mentanda tangani informasi kalo di bahasa indonesia-kan Lanjut ke langkah berikutnya. Jangan lupa untuk menaruh File superSU kedalam SD card dalam bentuk Zip atau belum di ekstrak.

tidak-tidak mengandung-driver-signature-informasi

Reboot Ke Advanced Startup Options

Sebelum memulai proses ini, pastikan untuk menyimpan semua pekerjaan Anda di semua program. Komputer Anda akan reboot selama proses ini.
Pertama, buka Pengaturan bergambar cakram/gear. Anda dapat melakukan ini dengan menggerakkan mouse Anda ke sudut kanan bawah layar Anda dan mengklik Pengaturan. Jika Anda menggunakan PC sentuh diaktifkan, geser di dari kanan dan ketuk Setelan. Tekan Windows Key + I(i) untuk membuka Pengaturan langsung dengan cara pintas keyboard .
open-setting-pesona

Pilih opsi Ubah pengaturan PC di bagian bawah Pengaturan.
open-pc-setting-app

Dalam aplikasi pgaenturan PC, pilih kategori Umum.
pc-setting-general-kategori

Gulir ke bawah dan klik Restart sekarang tombol di bawah Advanced startup. Komputer Anda akan reboot. jika General pada Pengaturan tidak muncul gunakan cara ini : 
Windows Key + I(i) - Search - ketik "Advanced Startup" - pilih "Change Advanced Startup options
Akses-maju-startup-opsi-on-windows-8

Akses Startup Settings

Ketika Pilih layar pilihan muncul, klik atau tekan opsi Troubleshoot.
memecahkan masalah-boot-opsi

Selanjutnya, klik atau tekan Opsi Advanced Options.
memecahkan masalah-maju-opsi

Pilih Startup Settings opsi di Advanced pilihan layar.
windows-8-startup-pengaturan

Klik tombol Restart pada Startup Settings layar untuk reboot komputer Anda lagi.
windows-8-startup-setting-me-restart

Nonaktifkan driver Signature Penegakan

Pada layar Startup Settings, tekan F7 atau 7 tombol pada keyboard Anda untuk memilih "penegakan tanda tangan pengemudi Nonaktifkan" pilihan.
windows-8-disable-driver-signature-penegakan

Windows 8 akan segera boot ke layar kunci . Masuk ke Windows 8 seperti biasa - semuanya akan terlihat sama, kecuali sampai Anda reboot.
Anda sekarang dapat menginstal driver unsigned seperti yang dilakukan pada versi Windows sebelumnya. Windows akan mengingatkan Anda jika Anda mencoba untuk menginstal driver yang tidak ditandatangani dengan benar, tetapi Anda akan melihat "install this driver software anyway" Anda dapat memilih.
install-unsigned-driver-pula-on-windows-8

Langkah Instalasi Driver

menginstal driver secara manual ke-dalam Windows 8.1, buka Device manager lalu pindah ke Acer Z200 kalian Lepas Batrai, SD card dan kartu perdana, pasangkan pada PC/Laptop, kembali lihat device manager
 

Klik kanan pada lingkaran diatas lalu pilih "Properties" lihat update driver device pada tab "Driver" dalam properties jika sudah lihat gambar bawah
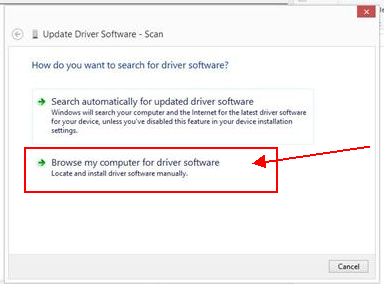
Pada opsi ini pilih "Browse my computer for driver software"
Tekan "browse" lalu cari file dimana Driver di letakan dalam bentuk folder bukan Zip maupun Rar kalau sudah Next terus sampai terinstall, jika sudah cabut HH Acer kalian

Langkah Root

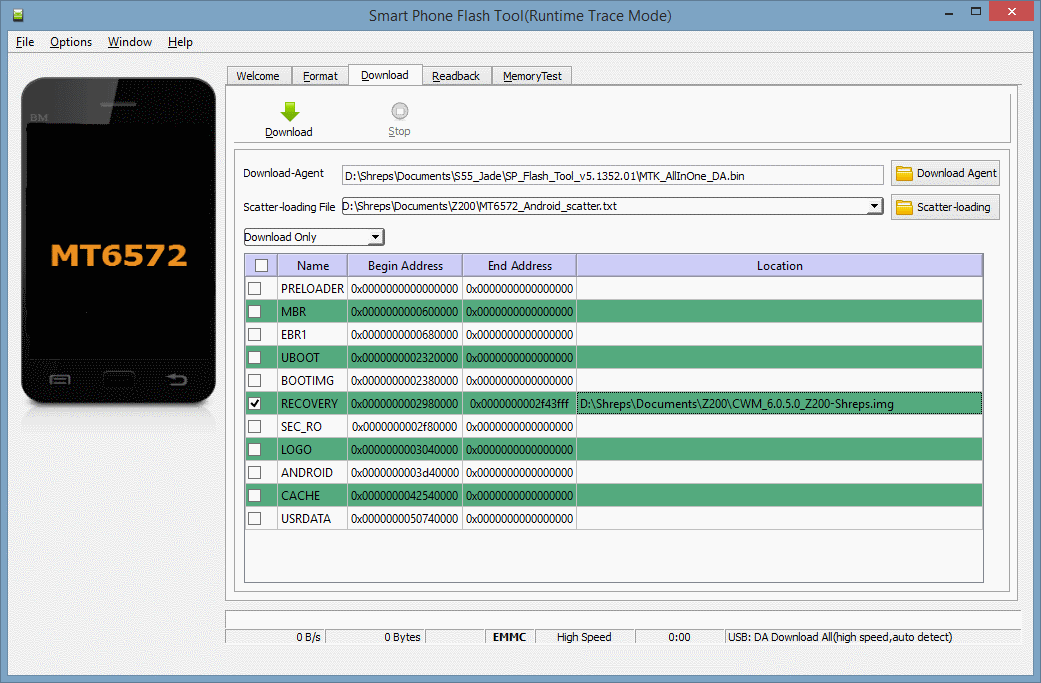
Masuk folder SP flashtool yang sudah dalam bentuk folder lalu cari "Flash_tool" Open atau Run as Administrator juga boleh  lihat pada gambar masukan MT6572 Scatter dan Centang recovery lalu klik 2 kali pada tabel Location seperti pada gambar, jika sudah cek HH Acer dalam keadaan Mati serta Batrai, SD card dan SIM card terlepas lalu klik "Download" pada SP flashtool lalu sambungkan HH dalam keadaan mati tanpa batrai Ke PC/Laptop tunggu sampai Done

Install SuperSU

Setelah Done, jangan buru buru pasang batrai dan nyalain HH , pasang kembali Batrai, SD card dan SIM card lalu tekan Power ( tombol kunci) + Volume Down (-) secara bersamaan pilih recocery dengan cara menekan tombol Volume up untuk OK dan volume down untuk menggerakan cursor,Masuk Recovery > Mount & Format > Mount semua sampai berubah /Unmount > tekan simbol kembail (back) > Install zip > cari dimana letak Update SuperSU v2.02.zip > yes > done ? > reboot, lalu cek aplikasi SuperSU di HH kalian.

Reboot


Setelah selesai menginstal driver unsigned, reboot komputer Anda. Windows akan tetap menggunakan driver apapun unsigned Anda sudah dimuat, bahkan seperti memaksa persyaratan Driver Signaturs untuk driver baru.

Sumber 

Baca selengkapnya

Feb 22, 2014

[ROM][CM7.2] AeronMOD

[ROM][CM7.2] AeronMOD


Introduction 
Dvikzz -  This AeronMOD(2.3.7) Based on CyanogenMOD RC1 By @percy_g2 If you ask about bug the answer is same as The based Rom too, this Rom Very smooth and faster i had no lag because my device never lag , if you dislike my work just go out from my thread i will appreciate it because im noob just want to make some change


Review

Features
Quote:
  • Gapps Included
  • Smooth, With Minimal Script Init.D
  • Holo KitKat UI
  • Latest CM7.2 sources for Custom Kernel and Stock Kernel
  • Reincardio Engine, The Reincarnation Of Audio Engine
  • Include Reincarnation Engine (Wait For Release)
  • Apollo Music Player
  • No Useless Apps
Installation Guide
Quote:
  • Download File Rom (2nd Post)
  • Reboot Recovery
  • Flash Any Kernel Support CM7 For GT-S5360 Only
  • Advanced
  • Format /system,/cache and /data (No /sdcard)
  • Mount /System,/cahce,/Data and /SDcard
  • Flash The ROM
  • Wipe Data and Cache
  • Reboot And Enjoy it !

Credits
Quote:
  • @percy_g2 for Base ROM
  • @Mobint For Holo
  • @Rheivaldo For My Inspirated
  • @aniket.lamba for my teacher and review my rom
  • @Nachiket.Namjoshi For the Kernel
    if your name should be here , PM me !

    Download:
    MEDIAFIRE : Aeron-D#1.0.2
    Black reActor kernel : CM#v1 (I recommend)
    Baca selengkapnya

    Feb 18, 2014

    [ROM][PORT][CM7.2] Radiance Final For Galaxy Young [GT-S5360]

    [ROM][PORT][CM7.2] Radiance Final For Galaxy Young [GT-S5360]


    Screenshots dont do it justice still....

    Features - #Storages
    Faster storages
    Auto cache clean n every boot
    Very low internal memory utilization


    #Silent features :
    Gapps included
    NO battery loss when screen off
    Full cm7 theme support
    100% bug free
    Trans-Layer UI(With lots of transparency)
    Removes useless system sounds
    Changed UI sounds
    Built in wallpapers
    Super SU
    Low memory footprint
    Status bar soft buttons-Enable in CyanogenMod Settings-Tablet Tweaks
    And lots more...Explore yourself


    Installation Guide


    1.Download the rom given below.
    2.Place it in the root of your sd card.
    3.Go to CWM and under mounts and storage,format system,data and cache.
    4.Go back and wipe data and cache.
    5.Again go to mounts and storage and mount system,data,cache and sd card.
    6.Flash the rom
    7.Wipe data and reboot.


    Baca selengkapnya

    Feb 12, 2014

    [Script][Share]CronMod-A2SD/D2EXT/INT2EXT

     https://blogger.googleusercontent.com/img/b/R29vZ2xl/AVvXsEiTwzBUIrpFV8mWRZcLHwXVJYb9jkqDSTv1Gt1MKyUkVjxreKW_NtJUMHQrkRWDVRYIXh0GgZ6oteRo4kL4BdxF1-DQDlRw6BXaIlhenEPVmjWqvKRDjh4P-cU_yqrKI9WeEpBf4yUCkFZy/s1600/sdcard+swap+external+to+internal.jpg
    Dvikzz - Hi guys! Since I'm always seeing a post about Amarullz and other A2SD scripts having problems like random force closes, bootloops, slow read/write and not working on Stock and CM9/10 Roms. I'm going to share with you an awesome alternative to those A2SD scripts like Link2SD, Amarullz, S2E, and DarkTremor's A2SD. I'm just sharing this so if you don't wanna use it leave it. I'm just giving you guys alternatives. Try to read the Notes first before posting violent reactions.

    Original Thread by croniccorey
    All Credits goes to him.

    Notes
    *Please try to read the whole thread to avoid problems especially the Prerequisites.
    *Please do a nandroid backup first if you're not coming from a fresh install of ROM so that we can avoid problems.
    *I am advicing you to flash this after a fresh install of ROM.
    *Please check your ROM's zip if it has a2sd scripts and remove it before flashing the ROM.
    *If you have any other installation methods kindly post it here.
    *The INT2EXT+ is the most advicable out of those scripts as it is the one used by the creator.
    *Moving /data/data to /sd-ext might slow down the performance of the phone.
    *If you choose a d2ext/int2ext script then remove the "06mountdl" or "06BindCache" in init.d folder if they exist as the script will do this from now on.

    (Taken from the thread)

    About:

    CronMod INT2EXT was wrote for use in my rom with the goal to achive a stable and fast way of moving the data partition of your phone to the sd-ext partition, they are available for all users and developers to use in any rooted rom with init.d support.

    CronMod INT2EXT scripts are the first universal INT2EXT method released

    Developer Stuff Next Post


    Features:
    (All scripts are tested on Android 2.3.7 - 4.2.2)

    INT2EXT
    -Mounts /sd-ext to /data
    -Works with EXT 2/3/4 filesystems
    -ZipAligns /data/app on every boot
    -No symlinks

    INT2EXT+
    -Mounts /sd-ext to /data
    -Leaves /data/data on internal for speed
    -Works with EXT 2/3/4 filesystems
    -ZipAligns /data/app on every boot
    -No symlinks

    INT2EXT4
    -Mounts /sd-ext to /data
    -Works with EXT 4 filesystem
    -ZipAligns /data/app on every boot
    -No symlinks

    INT2EXT4+
    -Mounts /sd-ext to /data
    -Leaves /data/data on internal for speed
    -Works with EXT 4 filesystem
    -ZipAligns /data/app on every boot
    -No symlinks

    INT2EXTV2+
    -Mounts /sd-ext to /data
    -Leaves /data/data on internal for speed
    -Works with EXT 2/3/4 filesystems
    -ZipAligns /data/app on every boot
    -No symlinks
    -Supports SWAP2INT
    -Completely universal (Testing is needed)


    Prerequisites:

    -Rooted Rom with init.d support
    -SD-EXT partition
    -100mb internal is needed for every 500mb sd-ext


    SD Card Partitioning:

    Partition 1 - Fat32
    Partition 2 - Ext 2/3/4


    Install:
    (Instructions based on ClockWorkMod recovery)
    -Download Chosen Script Below
    -Place on root of your sdcard
    -Reboot Recovery
    -Select "install zip from sdcard"
    -Select "choose zip from sdcard"
    -Select "CronMod-****_signed"
    -Select "mounts and storage" category
    -Select "format /sd-ext"
    -Reboot

    (if you already use a A2SD/D2EXT/INT2EXT/M2SD script then you will need to remove it completely)

    Downloads
    Kindly go to the Original Thread for the download links.
    Baca selengkapnya